Migrerad artikel
Denna artikel har migrerats från en tidigare version av vår webbplats och kan därför avvika i utseende och funktionalitet.
5 minuter
Normally, in order to add blocks to a content area, the user would drag and drop blocks from the assets pane:
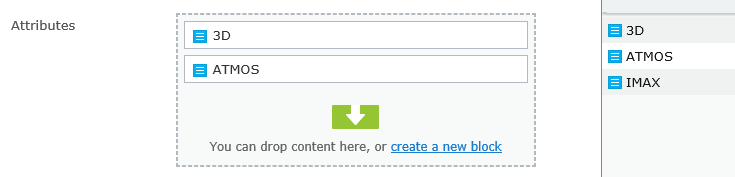
If we add an attribute to our ContentArea property, we can instead have it be edited using a custom editor:
[ClientEditor(ClientEditingClass = "website.editors.selectionfactorycontentarea.SelectMany", SelectionFactoryType = typeof(AttributeSelectionFactory))]
public virtual ContentArea Attributes { get; set; }
The custom editor displays a list of available blocks, and the editor can simply check the checkboxes for blocks that should be added to the content area:
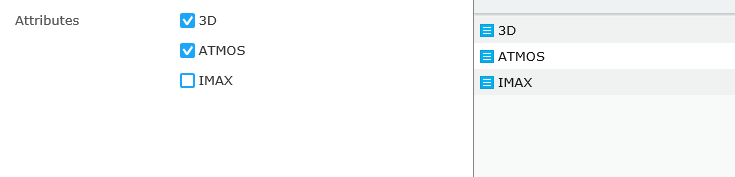
In other words, checking the 3D and ATMOS checkboxes above is the equivalent of dragging and dropping the corresponding blocks. Conversely, unchecking a checkbox is the equivalent of removing the corresponding block from the content area.
How does the editor know which checkboxes (i.e. blocks) it should render? The secret lies in the ClientEditor attribute introduced earlier. If you look at it, you'll notice we specify both a ClientEditingClass (i.e. a dojo widget) and a SelectionFactoryType.
If a SelectionFactoryType is specified, the widget will automatically receive its options (more on that in a bit). The selection factory itself is pretty straightforward: it simply returns a set of options where each option represents a block, the option value being the content reference ID of the block.
public class AttributeSelectionFactory : ISelectionFactory
{
    public IEnumerable<ISelectItem> GetSelections(ExtendedMetadata metadata)
    {
        var contentLoader = ServiceLocator.Current.GetInstance<IContentLoader>();

        // Get all blocks beneath a specific assets folder
        var attributes = contentLoader.GetDescendents(SiteSettings.VersionsAttributeCatalog)
                                      .Select(link => contentLoader.Get<BlockData>(link))
                                      .Cast<IContent>();

        // Return a selection factory option for each block
        return attributes.Select(attribute => new SelectItem
        {
            Text = attribute.Name,
            Value = attribute.ContentLink.ID
        });
    }
}
The custom editor, or dojo widget, is deceptively simple. Basically, we inherit the CheckBoxListEditor widget, the one you'd normally see when adding a SelectMany attribute to a property.
The only thing changed from the original implementation is the way the editor calculates the value of the widget, and how the checkboxes are checked/unchecked based on the value assigned to the widget, i.e. the property value of the underlying content area:
define([
    "dojo/_base/array",
    "dojo/_base/declare",

    "epi-cms/contentediting/editors/CheckBoxListEditor"
], function (
    array,
    declare,

    CheckBoxListEditor
) {

    return declare([CheckBoxListEditor], {

        _calculateValue: function () {

            // Overriden:
            // Content area properties expect an array value where each object in the array has (at a minimum) a 'contentLink' property
            // For each checked checkbox, add an object to the array, and set the 'contentLink' property to the checkbox's value
            // The checkbox values are in fact block IDs, as set by the selection factory

            var values = [];

            array.forEach(this._checkboxes, function (checkbox) {
                console.log(checkbox);
                if (checkbox.checked) {
                    values.push({
                        contentLink: checkbox.value.toString()
                    });
                }
            });

            this._set("value", values);
        },

        _setValueAttr: function (value) {

            // Overriden:
            // Compare each checkbox's value to the 'contentLink' property of each object in the property value array
            // If a checkbox value equals one of the objects in the array (i.e. one of the items in the content area), it should be checked

            this._set("value", value);

            array.forEach(this._checkboxes, function (checkbox) {
                checkbox.set("checked", array.some(value, function (v) {
                    return v.contentLink === checkbox.value.toString();
                }));
            });
        }
    });
});
"Great question. I'm glad I pretended you asked it." (Stephen Colbert)
The CheckBoxListEditor is originally intended to display a set of checkboxes based on an options property of the widget. In fact, if I were to write this.selections inside the widget code above, I'd get an array with the options from the selection factory.
However, I don't need to mind that at all, since the CheckBoxListEditor base class already takes care of creating the checkboxes and their labels, based on the widget's options property.
The overriden methods of the widget should be considered internal to Episerver, hence the leading underscores in their names. In other words, this implementation could break following UI changes in Episerver.
However, should that happen, you can always remove the ClientEditor attribute from the content area property and proceed using the standard content area editor.
If so, you may want to check out this introductory post on creating a widget for edit mode. Pay special attention to the dojo namespace, as you will have to have it set up in your module.config file in order for your custom editor to load.